Creative Photography Techniques Used by Top Photographers

Mature industries tend to be highly competitive. That fact may be relevant to no industry more than it is to photography. New full-frame mirrorless SLRs from Sony and other manufacturers can now be found scattered around the web with MSRPs of less than $500. This is an order of magnitude in price decrease when compared to the Nikon D1, which was widely regarded as the first commercial DSLR boasting a sticker price of $5,000 when it was released in 1999.
Consequentially, anyone with even the slightest interest in photography is now coughing up the cash for professional level gear and narrowing the gap between amateurs and professionals. The bar representing professional quality of work, so to speak, is continuing to get higher and higher. And amidst this environment, some photographers are able to continue honing their craft whilst others are falling to the wayside and losing clientelle.
Advanced photography techniques
Thought-leaders and innovators in the photographic community continue to curate and use cutting-edge photographic techniques which make their work to stand tall amongst the crowd. In the last few years, this has happened at a mind-bending rate. Prisming, blending, chimping (what?) are all new terms in the community describing the use of household items to create visual effects in camera, without post production. The net result has been a flood of new expressive artistic creativity that's moving the field in ways that hadn't been previously practiced.
How can individual photographers get involved? We'll help you below by touching on our favorite everyday items that we've been using to create new styles of work.
Ring of fire (metal tubing)

Ring of fire portrait tutorial
- Creativity5/10
- Ease 2/10
- Result Quality8/10
The 'ring of fire' technique (aptly titled due to it's ability to add a circular ring-flare around your subject) has been growing in popularity over the last few years. This technique involves placing a metal tube in front of the lens and using an external light source (usually the sun, but sometimes a strobe) to shine through the tube and into the lens.
You can use any type of tubing that can reflect light. Consequentially, metal and steel pipes are therefore preferrable to plastic. These tubes can be found essentially at any hardware store, in multiple finishes and fashions which all may produce different visual effects. Different diameters of tubing are well suited for different focal lengths, subject sizes, etc.. Lots of creative possibilites here.
This technique is useful, but can be difficult to implement correctly in the field, as an external light source must be in a very particular position relative to the lens to adequately reflect the glare from the light source into the lens. Without an external lightsource, the utility of these tubes quickly approaches 0 as they are only useful in their ability to reflect light. Without external light, you have just... a metal tube obstructing your view. These are therefore less versatile than other options, but still useful if you can properly identify environments where they'd be appropriate.


Definitely a lot of potential here, especially if I had a few different tubes of different colors/variations.
CD

CD portrait tutorial results
- Creativity2/10
- Ease1/10
- Result Quality6/10
Ah yes, the forgotten data storage system of the early 2000's. We all still have these lying around (probably not for long, though). And since their utility as a file store has long eclipsed, creatives are now using them to assist in taking images rather than for storing them. The question is, though, to what effect.
The rainbow-colored light flares that CDs emit can be useful to adding artistic flare to an image. But at a surprisingly-high level of difficulty, as the shape of CDs don't compose very well with the rest of a frame. An alternative option here is to shoot through the hole in the middle of the CD at a long focal length (~80mm+).
Maybe worth a try, especially if you don't have a lot of other tools to work with. However, the difficulty in usage and the limited ability to move the CD to change the visual effect it creates left me disillusioned with the technique. I'll revisit using the CD for photography another time, but I'm not planning on bringing it to any shoots in the near future.


Yes, you can do that with a CD. No, I would not have guessed that either.
Cool results, kind of invoking an other-worldly feel. Images like these would be difficult to capture using other techniques, so if this is a look you're partial to—a CD is the way to go!
Beading

Beading portrait tutorial results
- Creativity8/10
- Ease2/10
- Result Quality7/10
Beading (for lack of a better term—care to suggest some in the comments?) involves sticking a bunch of, yes, beads, in front of the lens and shooting through them. Depending on the size of the bead, the effects can range from quietly subtle to highly pronounced.
At a super-fast aperture, the beads are almost too tiny to notice, and you'll instead just notice the light signatures that they bounce into your lens.

At slightly slower apertures, you can get the color, shape, and even reflections of the beads to be more highly pronounced which can add a strong visual component to your images. I usually find that bigger beads produce more visually preferrable effects.
You might have a hard time explaining to clients what you're doing, especially if you're shooting a high-pressure situation like a wedding. This makes using beads less than optimal for some scenarios, but they can definitely create great results for portrait and engagement photoshoots.


The larger beads (~1in in diameter) used for the bottom-righthand picture were able to capture reflections of nearby trees. In crowded cities or urban environments there might be a lot of room to reflect interesting objects with beads.
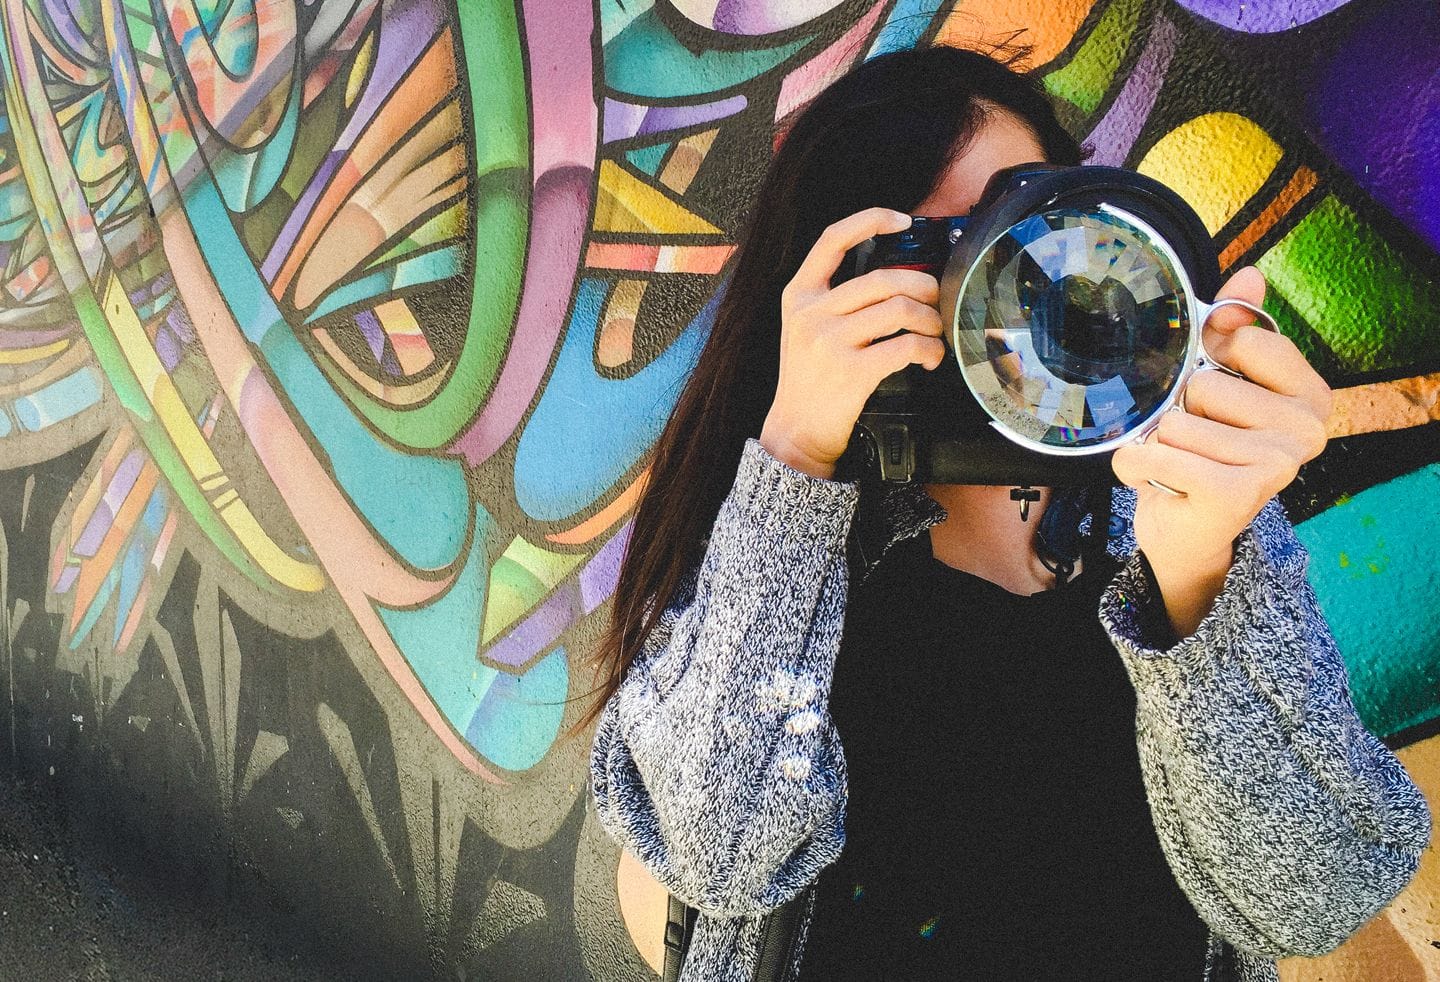
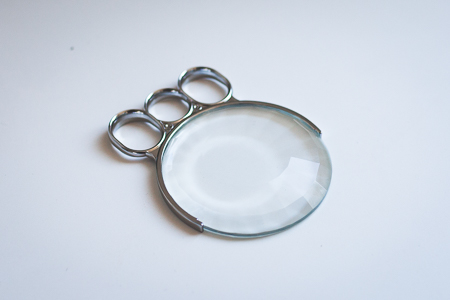
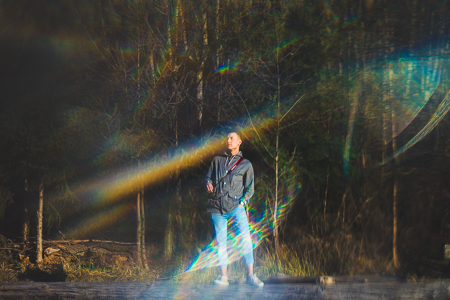
Prisming
Prisming portrait tutorial results
- Creativity10/10
- Ease7/10
- Result Quality10/10
Prisming is, of course, our darling child. Battle-hardened and a proven way to create great images, prisming has been taking the internet by storm as photographers use different types of glass to augment their photos. Fractals are the easiest way to create great prismed images, but there are also other options available until you can get your hand on a set (like mirrors, rectangular prisms, etc).
There's no need for us to explain prisming here, we've already written an entire guide here. The images below were taken with Fractals (as were the rest of the images on our site).


One last tip: to get good results, you should shoot a lot. Sometimes the results are rather unpredictable, so you should capture as many frames as possible to make sure you'll get one you like! I also find that playing with my aperture a lot, between f/1.2 - f/4 can help mix things up and apply appropriately for different situations. As with anything else, practice makes perfect, and we're still practicing a lot to learn new techniques that we can bring out in shoots.
Wedding photography techniques
For weddings, I'd primarily stick to prisming. Why? It's guaranteed to get good results, it's easy to pull your prism out & return it back to it's case in a matter of seconds. Other photographic techniques require a lot more care to be implemented correctly, and weddings don't have a whole lot of room for error.
Prisming is also a great conversation starter, helping you to connect better with the wedding party. If you're holding a CD or beads in front of your camera, people may instead question your sanity.
Engagement photography techniques
Engagements have a lot more room for error, and in shoots like these you'll have a lot more room to use techniques such as beading or the ring of fire. I'd recommend taking 5-10 shots each time you bring one of these tools out to guarantee that you get a great shot.
Portrait photography techniques
Portraits are very similar to engagements in that you don't have to worry about missing precious moments that may happen in a quickness. This will allow you to try speical techniques which you otherwise may not have time to try.
What's your favorite technique? We'd love to hear about it in the comments! If you let us know anything noteworthy you've tried, we'll play with it ourselves and add it to this guide! Special thanks to Robert Doan for letting me borrow him to grab these shots. :p

Published by Nikk Wong
Nikk Wong is a photographer, probably very much like yourself. He began his career shooting weddings and portraits, but quickly became obsessed with prism photography. Now, he spends his time building lenses and products in an effort to bring the magic of prisming to a mainstream audience. (Can I stop talking about myself in third person now?) 🙃